
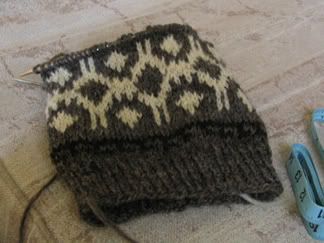
There! The second chart has been completed. Now, it's time to measure. This turned out to be 6". A previously knit hat had a body of 5" and I found that a bit short for me, so 6" is good. It won't be sliding off my head like the 5" hat might. There is nothing worse on a cold day than having to keep pulling your hat down over your ears when you're trying to hold on to other things, too!
At any rate, the body of the hat is just the right length. Had it been a little shorter, I could have added one more repeat of the first chart, but I don't think it's needed, really. So, it's on to the grand finale.
Remember I said at the beginning that 84 stitches is divisible by 6? Here's where that comes into play. We're going to work the top shaping in six "wedges". 84 stitches divided by 6 sections gives us 14 stitches in each section, right? What we'll be doing is decreasing each of those 14-stitch sections on every other round until we have 42 stiches remaining; that's half of the original 84 stitches. From that point on, we'll decrease on every round until only 6 stitches remain. That will give the top a nice rounded finish. If we were to continue decreasing on every other round, the top would come out somewhat pointed.
In the process of making this hat, I did find one small error in my chart, so I'll have to go back and correct that. Tomorrow, I'll write up the complete pattern and it will be posted to my Freebies page.
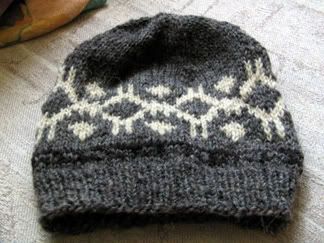
Incidentally, it fits me perfectly, is just the right length and, according to John, looks good! I'll try to get him to take a picture of the hat on me so you can see, too.
When writing up a pattern, I use Word for Windows for the written part, then copy and paste it into a template I've made in PageMaker. I know I could do the entire thing in Word, but with the version I have, I can't make a .pdf file; I can with PageMaker.
One more note about this yarn; as stated before, this yarn came without labels of any kind. It's like the White Buffalo yarn, but finer, so I'm thinking it's a worsted weight, which is pretty much what it knit up as. That being the case, any worsted weight yarn may be substituted in this pattern. Just because I used this yarn (whatever it may be) doesn't mean the hat won't work with another yarn. Make sure you check your gauge!
There you have it, the process I go through when designing a pattern. Granted, it's a very simple pattern, not a lot of ripping, tearing and hair-pulling involved. It does, hopefully, show you some of the thinking and planning involved. If you've never tried to design your own hat, sock, or whatever, maybe this will have inspired you just a little bit to try it yourself. All you really need to start is a basic hat pattern that you can customize, either with a fair isle-type pattern or a stitch pattern. Then, just play with it! Have fun!


Your hat came out really nice. I'll keep the pattern for later! :)
ReplyDeleteHave a nice weekend!
Pretty cool stuff Ev :) Nice design and nice work!
ReplyDeleteThanks for the walk-through!